Vertical Blades Divot Repair Tool
**Patent pending**
vs
Traditional Flat Blades Tool
.jpg)
5 Reasons
to use
Vertical Blades
( A Design to use Turf
to cover the mark )
Awareness:
1.
Each golfer must be aware the current technique of repairing ball marks exposing the soil and roots to the surface is producing many more brown spots as above, though it may be the golfer's good intention,.
2. Brown spots shown above are taking 4 to 12 weeks to heal.
3. Providing just a tool is not good enough without correct instructions to save an indented turf then to stretch near by turf, as printed instructions on a back of handle.
4.
Once golfer stops the old skills and adapts this new skills to repair in sequence, our greens should look much better, green grow healthier, putt smoother and cost much less to maintain.

Wide blades disadvantages
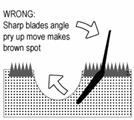
- Design to leverage and expose Soil and Root to the surface --- Negative
- Allows continuous twist and pry up motion toward thin blades direction underneath the hole to expose the soil while cutting all underneath root. --- Negative
90° angled thin edged parallel blades with gently angled handle advantages
- Design to stretch turf to cover damages with only with turf --- Positive (1)
- Allows to move only toward thin edged blades side, and preventing sideway move -- Positive (2)
Sharp Angled Blades Application disadvantage
- Sharp leverage blades angle force is to cut off root all the way up to the surface along with the soil exposure to the putting green
--- Negative
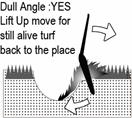
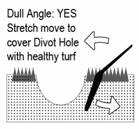
Dull Angled Blades Application advantage:
- Dull blades angle is gentle to lift indented turf back to original place using thin edged blades and then stretch healthy turf back to cover the indented damage with turf
--- Positive (3)
No instructions:
- Without proper instructions, a golfer is tend to keep using old fashin pry up method
---- Negative
Instructions printed on a back of handle:
- First-class levers as 1st action to recover indented turf back to the surface using thin edges.
Second-class levers as the followed 2nd action to stretch not only health turf back to cover the damge but also hold up just lifted indented turf by action 1.. ---- Positive (4)
Wide Blades cut off:
- 1st action to save an indented turf with wide blades acts like a knife to cut it off from the main surface turf group resulting little chance of survival. .
-------- Negative
90° angled thin edged parallel blades advantages:
- Thin edged blades alone is to cut through turf, yet each 90° angled thin edged parallel blade has the thin edged blade thickness of about 0' 1/16" to holds turf roots group and the width of 0' 2/8" on the both side of blade has enough blades surface exposure to gain friction against the soild/roots/turf group to stretch them while protecting verticaly grown roots group.--- Positive (5)
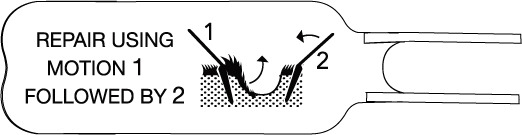
1, 2, 3
repair divot damage only with turf
1st Action. Save the indented turf: Use the vertical stretch blades as shown using First-class leverages from the high side of the indented turf to the surface. This dull angle relative to the handle and thin edged blades application to this spot prevents the indented turf to be lifted back to the original position without cutting it to heal quick.
Caution: Don't replace completely torn off turf back to the divot hole. It will die anyway.
2nd Action. Use healthy turf just outside a divot:: Apply blades as shown with Second-class leverages a few times by stretching turf toward the center to fill up depression with turf.
3rd Action. After completion of repair, tap it down with putter.
Action 1.
Recover indented turf back to the surface
Stretch-turf toward center a few times
Leverage-up-move with sharp angle
exposes roots and soil
l